


thefreshestever
-
Posts
821 -
Joined
-
Last visited
-
Days Won
2
Content Type
Profiles
Forums
Events
Everything posted by thefreshestever
-
that looks much better!!! yeah, frustrating is the right word. if you can´t figure out what´s causing it, redoing everything from scratch with no difference, and then somehow it works. and you still have no clue what was going on...
-
yeah, i haven´t used v17 either because it´s really unstable... seems to be just the mac version, otherwise more people would complain about it let´s hope v18 will be better optimized for mac. but i´ve also had issues of shadows not showing up lately, it was really weird... can´t remember exactly what i did to fix it... it had something to do with the combination of lights in the scene... i think i had just one sunlight and one klieg in the scene, and shadows didn´t render... then i dropped an additional sunlight into the scene, turned it off, and then it rendered correctly. something like that.
-
hmm... i liked this scene with the modeled trees better somehow to be honest. i think it´s because those image don´t cast any significant shadows (the car doesn´t seem to be either), and they are not 100% clean cut out, maybe it helps if you could get rid of the bright edges. i also would increase the contrast on those trees to get them closer to a model train miniature look.
-
update. rotation_car_low_new.mov
-
thanks... here´s a preview of the car... it´s actually the first car i´ve ever modeled. still a few things to add and fix, and i noticed i got to adjust the lights for the 360° rotation of the car. the behaviour of the shadowing looks odd that way... the lights more from above should do the trick i think. rotation_car_low.mov
-

Where can I find Action file documentation?
thefreshestever replied to Visping's topic in Animation:Master
you have a robot that you want to control with an a:m action? sound´s cool... and complicated you can open any a:m file with a text editor, a simple action will be actually not that difficult to understand. hope you´ll get it to work. -
Excellent! Thanks... (Now to figure it out without using squetch rig..but I think the basic info is there. Simpler is always better!) hmm, i guess you could just create some bow bones as children of the thigh / calf / bicep / forearm bones and make a pose with a slider where you move them in the z-axis, so they will form a smooth bow...
-
thanks, mark... i´ll try that later.
-
Thanks for the info Your new lady model looks terrific as well! How are you getting the bendy look on the limbs? (ie could you illuminate some hints on the weighting? geometry rig? or some other magic?) as you can see in the wireframes, i only use one splinering at the knee and elbow joints. with the squetchrig you can bend the bicep, the forearm, the thigh and the calf, that´s all you need basically. the splinerings on the arms and legs are weighted to the bow-geometry bones. on the right leg from up to down for example they are weighted like this: the cps on the very upper leg are weighted differently, some percentage spine 1 stomach geom, some percentage right thigh bow 0 geom, after that it continues as following: 100% right thigh bow 0 geom, 100% right thigh bow 2 geom, 50% right thigh bow 3 geom/50%right calf bow 0 geom (that´s the knee-joint), 100% right calf bow 2 geom, 90% right calf bow 3 geom / 10 % right foot geom.... the simpler your model is, the easier it is to get a smooth curve on the joints. if you have a classical knee joint of 3 splinerings close together it´s very hard to get a smooth curve when bending the leg. it surely is possible, but you will need much more splinerings and quite a bit of time to figure out the correct weighting so the leg will look good i every stage of bending. the solution with just one splinering of course always has a slight curve in it, even if you set the bow to 0%, but since i always want them with a slight bow, there was no need for me to add in extra splinerings
-
The Passing of a Titan (Paul Forwood)
thefreshestever replied to Paul Forwood's topic in General Announcements
oh, i did not know paul died. sad news. my condolence. -
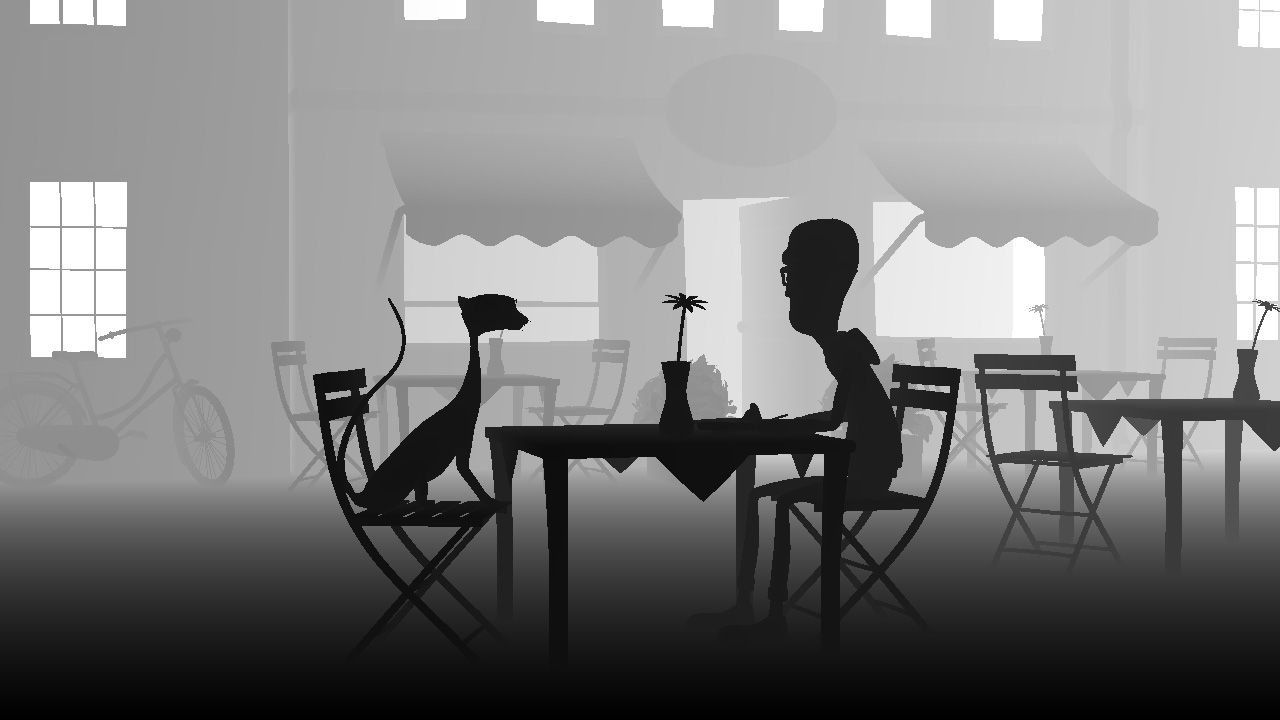
finished modeling, rigging and texturing the waitress. i used cloth for hair, because i couldn´t prevent thick strands of hair not going through head and shoulders. wouldn´t have been a problem with thinner hair, but if you have hair strands that are 10 cm thick and the collision detection is calculated by the use of a thin spline there seems to be no way to get it right. i´m pretty happy with the cloth-hair look for now, but i´m sure i will be tweaking it a little more. i updated the other characters as well, did a little tweaking on the geometry and textures. next steps: modifying an existing model of a fat guy, modeling a cool toon car. rotation_waitress_low.mov rotation_cat_low.mov rotation_baldy_low.mov
-
nice model!!! if the patch count gives you headaches, you might want to think about how much detail you´ll really need later in your animation. if you don´t really have some close-up shots of those vents some bump and/or displacement maps on much simpler geometry will do the trick as well.
-
i´m not giving up on it that fast. your test showed that it can work as it should. so there must be something causing the problem, i just need to find out what it is... if i do, i´ll let you know
-
nancy, i just use toon with multiple lights, with the gradient from black to white meeting as hard as possible right in the middle, so it´s as flat shaded as possible (ok, no gradient at all would be even flatter, but that´s not the look i´m going for.) . i "cheat" a little shading back into my scenes in post, just using the normal z-map with 20% opacity of that layer and set to "color burn". i also use light lists for the chacters and a few props to highlight them with a hard kicker, so that they would really pop out of the scene. for the skin i use an orange ambient color set to 20% ambience intensity, that really helps the look, too. they ARE not 100% transparent. about 50% i´d say.
-
this is really really weird. i tested your prj, and i get the same results you do... i dropped a character in that chor which i had this problem with in the past, and it works, too... but why???? then i opened my current project again, and rendered the scene out where i had the issue with the windows. and it´s still there, all the windows are white, but they should have the same grey value as the walls around them. look at the depth-map of that scene i attached. my suspicion was that in this case it could be that the problem is caused because the transparency isn´t set in the properties of the group but driven by a transparency map. i made a copy of the opaque left side of your testmodel and decaled it with that transparency map, and then again i get something different: the geometry is completely ignored as if it was 100% transparent, but it´s not, as you can see. but: it´s not competely white either, like in my other scene (in that particular scene there´s geometry right behind the windows). i don´t get it! nothing of it.

-
i suppose fog would work, but that would mean i´d have to render everything twice, i want to avoid that. for this particular project it isn´t cruicial, since it´s toon and i don´t have to have tranparency set on anything except the windows in one shot, and the DOF is´nt that significant. but usually it´s the characters eyes that make problems with depth maps, because the cornea has a transparency. is it happening on windows, too? i don´t have a a:m version for windows running anymore, so i can´t test it. thanks, mark... i´m usually not a big fan of toon-render either. but lately i discovered some shorts that really blew my mind, and i thought "i need to do that (or something half way close to it, i´m just one person, not a studio or collaborative) in a:m".
-
White would signify infinite distance, so what you are saying is that there si something behind the transparency that is not infinitely far away? yes. everything set with transparency is completely white, no matter how close it or what´s behind it is to the camera. i always had this issue, so this is not just happening in the current version of a:m. i always used the workaround of simply just not using tranparency when using a depth map, but it´s time to find a more satisfying solution
-
thanks guys... here are some testrenders of the sets with characters, still need to model some additional props and tinker with some decals. i´ve downloaded some files from the a:m ressources forum and modified them to my needs, thanks for uploading these. still very happy with the rendering times. those shots took between 1.20 min and 2.50 at 720p, 5 passes, depth and normal buffer activated:) things to do: additional props, modifying decals, model the waitress, modify an existing model of a fat guy who will sit at one of the tables in the back. and of course: animation, sounddesign etc i have some issues with the depth maps: everything with a transparency set is always white in my depth maps, is there a setting i´ve overlooked or is this a bug?
-
good start! try to reduce the hunchback, at the moment he looks more like igor than hulk maybe it would be a good solution to use a rotoscope, the web is packed with hulk-images for reference. but if you´ll make him as beefy as hulk, you might want to think about making the face a little bit meaner, at the moment he´s looking very soft and boy-ish, that doesn´t fit exactly the bodystructure of a hulk.
-
thanks... robert, i was actually thinking about that, too... i will tinker a bit more with the lighting later on... david, for this character i propably don´t need a perfect round knee and elbow bow, since it´s gotten more sketchy, and not so much vector-illustrative now...the new character has only one splinering as elbow and knee, so i don´t know if your fix would be practicable on this one... but i´d be interested about that fix anyways... i´ll send you both characters via email... thanks so much for your help.
-
this is going to be good i like everything about it... the characters, the sets & props, the whole idea and the name of course.
-
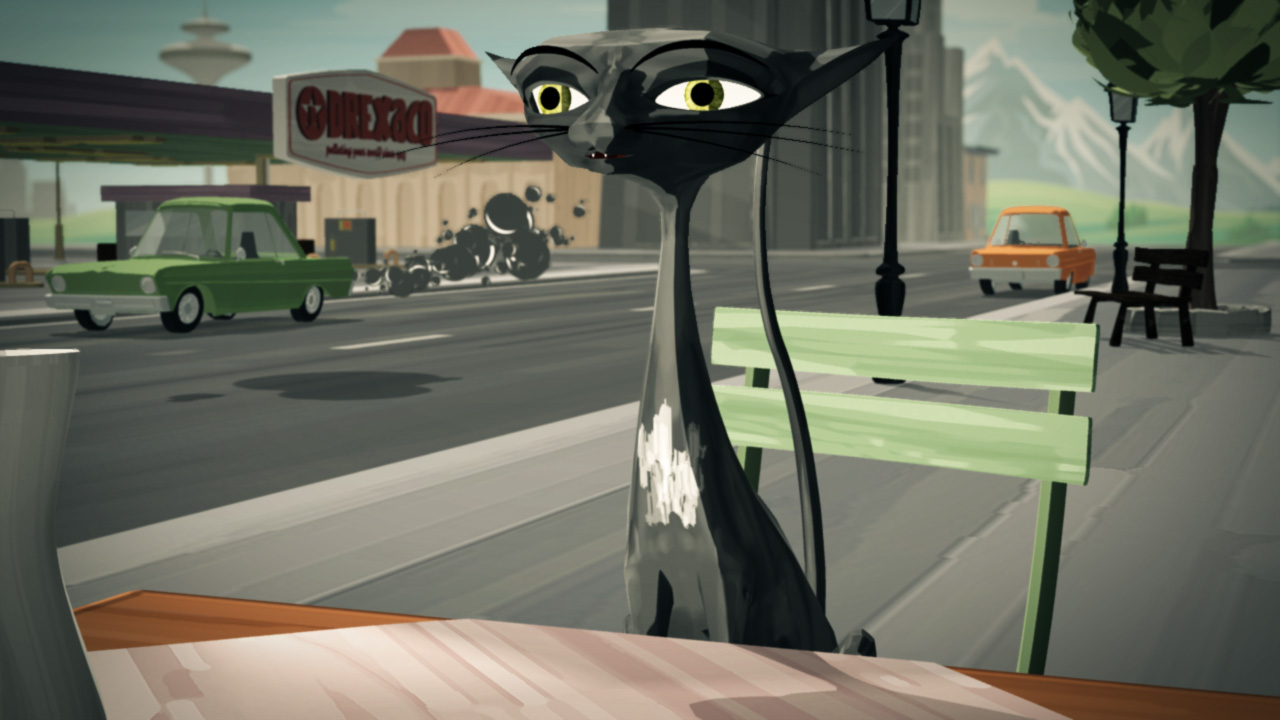
i like that look so much that i´ve decided to do a little short... here are two 360° spins of the two main characters. rotation_cat_low.mov rotation_bald_guy_low.mov
-
that´s pretty cool.. i´ve done a lot of stuff with audio-react with several after-effects plug-ins, this can be a real powerful tool for music videos and stuff like that. lookin forward to testing it...
-
try to get rid of the poppin in the hip-area, and move the foot that passes the leg a little bit more to the side, so that the foot doesn´t look like it´s going through the calf..
-
doesn´t the split-patch plug-in work here? you would just make a copy of your spline-efficient model, apply split-patch several times, and then export it.. shouldn´t be that hard to modify the export plug-in so you could define the number of splits before the actual export... regarding the wine glass in sketchup, i guess it could be done in less than 8 minutes, but it still seems awfully complicated